English Summary: This comprehensive guide explores Webinoly, a command-line tool for setting up a WordPress site on a Virtual Private Server (VPS). It covers the key steps for installing WordPress with Webinoly, showcases key features, and provides resources for further reading. It also reflects on the author’s journey with Webinoly and compares it to other similar tools. Hindi Summary: यह व्यापक मार्गदर्शिका Webinoly का अन्वेषण करती है, एक कमांड लाइन उपकरण जो एक वर्चुअल प्राइवेट सर्वर (VPS) पर WordPress साइट सेटअप करने के लिए। यह Webinoly के साथ WordPress स्थापित करने के लिए मुख्य चरणों को कवर करती है, मुख्य विशेषताओं का प्रदर्शन करती है, और आगे पढ़ने के लिए संसाधन प्रदान करती है। यह लेखक के Webinoly के साथ यात्रा पर चिंतन करता है और इसे अन्य समान उपकरणों के साथ तुलना करता है।
Introduction
Webinoly is a potent command-line tool that streamlines the process of setting up a WordPress site on a Virtual Private Server (VPS). With the ability to install PHP, MySQL, and the Nginx web server, Webinoly simplifies the creation, modification, backup, cloning, and deletion of websites. In this updated guide, we’re delving into the process of installing WordPress using Webinoly. An open-source, script-based installer, Webinoly streamlines the setup of a LEMP Stack (Linux, NGINX, MySQL, and PHP) on Virtual Private Servers (VPS). This potent command-line tool enables you to create static and WordPress websites, establish staging sites, park domains, and much more. Let’s explore how to leverage Webinoly for WordPress site creation. We will use a Linux VPS with Ubuntu 22.04 LTS for the installation, as per the recommendations for Webinoly.What is Webinoly?
Webinoly offers a powerful command-line tool designed to streamline the setup of a WordPress site on a Virtual Private Server (VPS). It simplifies the installation of PHP, MySQL, and the Nginx web server, allowing users to create, modify, backup, clone, and delete websites with ease. It is especially beneficial for those who prefer to have granular control over their server setup. This post, originally published in January 2020, has been updated to reflect the latest advancements and provide a fresh perspective on using Webinoly. Alternatives to Webinoly include WordOps, EasyEngine, Slickstack, Centminmod, and Ols1click. These tools offer the capability to create diverse types of websites, from static HTML to WordPress sites. I have published a separate post which compares the different command line installers for WordPress on a Linux VPS. You can read it here.Discovering Webinoly
Nearly four years ago (in early 2020), my journey with Webinoly began. My initial experimentation was a hands-on experience, setting up a WordPress site on a VPS using Ubuntu 18.04 and Kernel 5.0. This exploration has since evolved into a deep understanding of various methods for establishing WordPress on a VPS.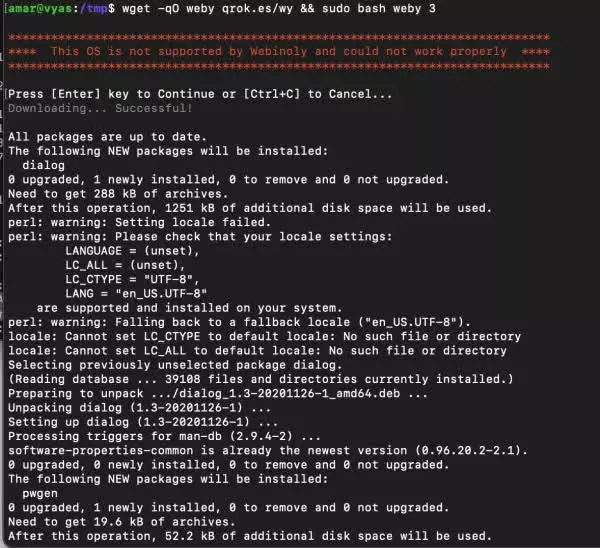
Webinoly may get install on Debian 10, but may not work properly. Image from my testing in November 2020.
Early Experience and Reflection
Upon reviewing the original post, I realized that much of the content was dated, though the installation method had not changed much. Therefore, I decided to update this blog post with more current information (as on January 2024) that will make the content more relatable and actionable for the readers. Celebrating Milestones and Updates As of January 1, 2024, exactly four years from the original publication date, I’ve expanded the Webinoly content with several new posts:Using Webinoly for WordPress Installation on a VPS
To use Webinoly for WordPress site creation, you’ll need a VPS with Linux. Ubuntu 22.04 LTS is recommended (X86 and arm versions are both supported),- Connect to your server: Log in as a regular user with
sudoprivileges. Avoid logging in as root due to potential security concerns. - Prepare a clean server: Ensure the server is clean, without any other servers or applications. The templates provided by your VPS host usually meet this requirement.
- Log on to your VPS: Use SSH on Mac or Linux terminal. Windows users can use Putty.
- Install and configure Webinoly: Use the following command to install Webinoly in an interactive manner:
wget -qO weby qrok.es/wy && sudo bash weby 3 - Install WordPress: Use the command
$ sudo site yoursite.in -wpto install WordPress.
Step-by-Step Guide: using Webinoly for WordPress Install
Now, let us take a look at the key steps in detail, and understand what each step entails.- Prepare a clean server: Ensure the server is clean, without any other servers or applications. For sake of simplicity, ensure your server has atleast 1 GB of RAM, 10 GNB of disk space, and 1vCore of CPU. Operating system for this KVM server will be Ubuntu 22.04 (highly desirable). In the past I have tested using Ubuntu 18.04 with similar hardware configuration and did not experience any challenges.
- Connect to your server: Log in as a regular user with
sudoprivileges.The below command is used to connect securely to your VPS over the Internet.$ ssh username@your_server_ip
ssh: Stands for Secure Shell, a protocol for securely accessing remote machines.username: The user account on the VPS that you’re logging into.@: Separates the username from the server’s IP address.your_server_ip: The IP address of your VPS.
username account. Once authenticated, you’re logged into the server with a command-line interface.
- Install Webinoly: Use the following command to install Webinoly (i.e. download and execute the Webinoly installation script.)
$ wget -qO weby qrok.es/wy && sudo bash weby 3
wget: A utility for non-interactive downloading of files from the web.-qO weby: The-qflag tellswgetto run quietly (without displaying download progress). The-O webyflag specifies that the downloaded file should be saved with the nameweby.qrok.es/wy: The URL where the Webinoly script is located.&&: This is a logical operator that allows you to execute a second command only if the first command succeeds.sudo: This command is used to execute the following command with superuser privileges.bash weby 3: This tells the shell to execute the scriptwebywithbash, and the3is an argument passed to the script, which typically indicates that you want to install a full LEMP stack.
- Install WordPress: Use the command
$ sudo site yoursite.in -wp
site: This is a Webinoly command that manages sites on your server.yoursite.in: This should be replaced with the domain name you want to use for your WordPress site.-wp: This flag tells Webinoly to install a WordPress site.
When you run this command, Webinoly will handle the setup of a new WordPress site, including configuring Nginx to serve the site, setting up the database, and installing WordPress itself.Note: Remember, it’s important to replace placeholders like
username, your_server_ip, and yoursite.in with the actual values that are relevant to your server and domain.
Additional Commands for customizing configuration
Below are my notes from original post of 2020 For my experiments, I used a VPS provided by Hosthatch and installed Webinoly on an Ubuntu 18.04 server. I created two sites with the following commands:$ sudo site mysite.in -wp -cache=on
$ sudo site staging.mysite.in -php
$ sudo site -delete-all
Exploring Webinoly and WordPress Administration A quick Google search for “WordPress Admin for Webinoly” led me to several helpful resources, including tutorials and official documentation, which provided insights into managing WordPress sites with Webinoly.
Enabling SFTP with Webinoly For secure file transfer, enabling SFTP access for the www-data user is a straightforward process with Webinoly:
$ sudo webinoly -login-www-data=on
- 22/TCP (Inbound/Outbound)
- 25/TCP (Outbound)
- 80/TCP (Inbound/Outbound)
- 443/TCP (Inbound/Outbound)
- 587/TCP (Outbound) *Optional for SMTP
- 11371/TCP (Outbound) *GPG Keys
- 22222/TCP (Inbound) *Admin area
Note
Webinoly installs the most current version of PHP, which as of the date of writing this post, is PHP 8.3. If you need to reset server settings at any time, use the command$ sudo webinoly -server-reset.
Webinoly Resources and Further Reading
For more information on Webinoly, check out the following resources:
Ensuring a Successful Webinoly Setup To ensure the integrity of the Webinoly installation, you can use the following command:
$ sudo webinoly -verify
How this command works
When you executesudo webinoly -verify, Webinoly will check the integrity of the entire system. This includes verifying that all the components of the LEMP stack (Linux, Nginx, MySQL/MariaDB, and PHP) are installed and configured correctly. It also ensures that any optimizations and security measures provided by Webinoly are properly set up and functioning as expected.
If any issues are detected during the verification process, Webinoly may provide warnings or error messages, along with recommendations for resolving them. If everything is in order, it will confirm that the integrity test has passed, indicating that your Webinoly-managed server is configured correctly and ready to host websites reliably.
This command is particularly useful after initial setup, updates, or when troubleshooting potential server issues, as it provides a quick way to ensure that the server’s software environment is stable and secure.
Webinoly on LXC VPS
If you’re using a LXC type of VPS, Webinoly can still be installed with some additional configuration. However, Webinoly might not work properly on NAT, and advanced configuration settings could be required.Conclusion:
Webinoly remains a robust and efficient tool for managing WordPress sites on a VPS. With its continuous updates and strong community of users, it’s an excellent choice for both novice and experienced server administrators. Stay tuned for more updates and tutorials on leveraging Webinoly for your WordPress hosting needs.With this updated guide, you’re now equipped with the knowledge to create a WordPress site using Webinoly.This command line tool enables WordPress Deployment, administration, and backup of your site. Whether you’re a technical user or just a beginner, Webinoly offers a straightforward way to establish and manage your WordPress site.
This post was updated on 18 February 2024.